Configuring OpenID SSO for Salesforce

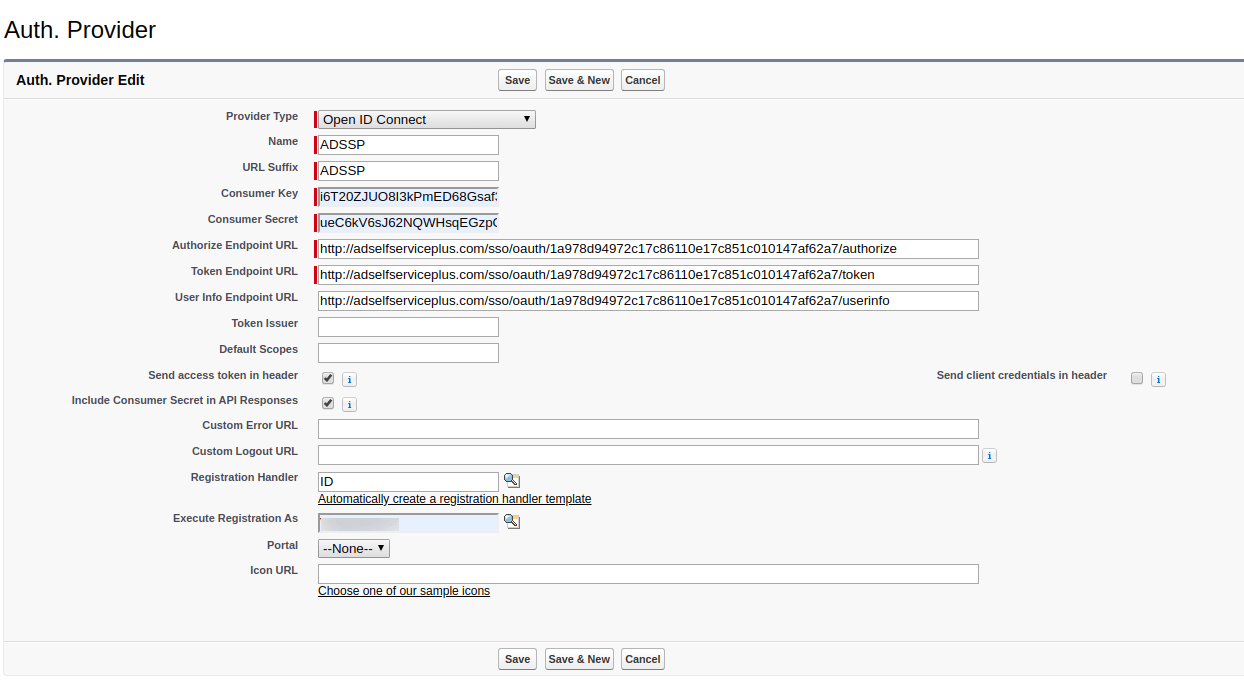
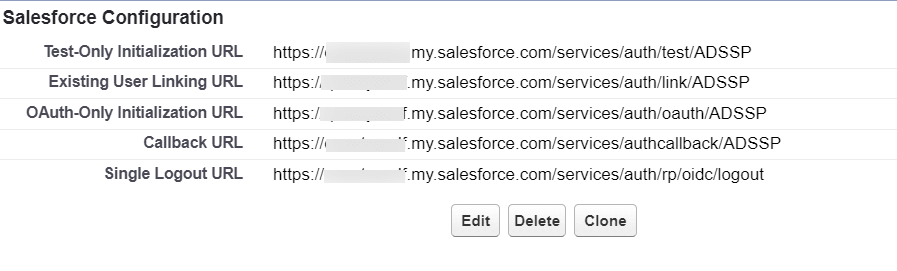
These steps show you how to configure the single sign-on (SSO) functionality using OpenID Connect between ManageEngine ADSelfService Plus and Salesforce.

  • Do not terminate the session before the configuration is complete in both the identity provider and the service provider.
  • Please enable HTTPS is the product to ensure proper functioning of single sign-on.
  1. Login to ADSelfService Plus as Super administrator.
  2. Go to Configuration > Password Sync/ Single Sign On and click Add Application. Select Salesforce from the list.
  3. Note: You can also use the search bar, in the top-left, to search for the application.
  4. Click on IdP Details and select the SSO (OAuth/OpenID Connect) tab.
  5. Copy Client ID, Client Secret, Issuer, Authorization Endpoint URL, Token Endpoint URL, and User Endpoint URL.
  6. Configure Oauth or OpenID Connect SSO for custom application

Salesforce (service provider) configuration steps

  1. Login to Salesforce with administrator's credentials.
  2. Navigate to the Setup page from the Gear icon in the top-right corner.
  3. Configure Oauth or OpenID Connect SSO for custom application
  4. Search for Auth.Provider in the Quick Find/ Search box in the top-left. This is where you can add new authentication providers.
  5. Click New to add a new Auth. Provider.
  6. Select the Provider Type as Open ID Connect.
  7. Configure Oauth or OpenID Connect SSO for custom application
  8. Enter the Name and URL Suffix, which will be used in the client configuration URLs generated by Salesforce, according to your preference.
  9. Fill the following fields with the corresponding details saved in step 4 of the Prerequisites:
    • Consumer Key: Client ID
    • Consumer Secret: Client Secret
    • Token Issuer: Issuer
    • Authorization Endpoint URL: Authorization Endpoint URL
    • Token Endpoint URL: Token Endpoint URL
    • User Info Endpoint URL: User Endpoint URL
    Configure Oauth or OpenID Connect SSO for custom application
  10. Now, click Automatically create a registration handler template link under Registration Handler. Registration handler is a code snippet that matches service provider attributes with the corresponding identity provider attributes.
  11. For Execute Registration As field, give the Salesforce admin account details.
  12. Click Save.
  13. Configure Oauth or OpenID Connect SSO for custom application
  14. After saving, copy the Callback URL as it will be required for Login Redirect URL in ADSelfService Plus' configuration.
  15. Configure Oauth or OpenID Connect SSO for custom application
  16. Now click the link next to Registration Handler.
  17. Configure Oauth or OpenID Connect SSO for custom application
  18. Go to the Class Body tab and replace the existing code with the following code:
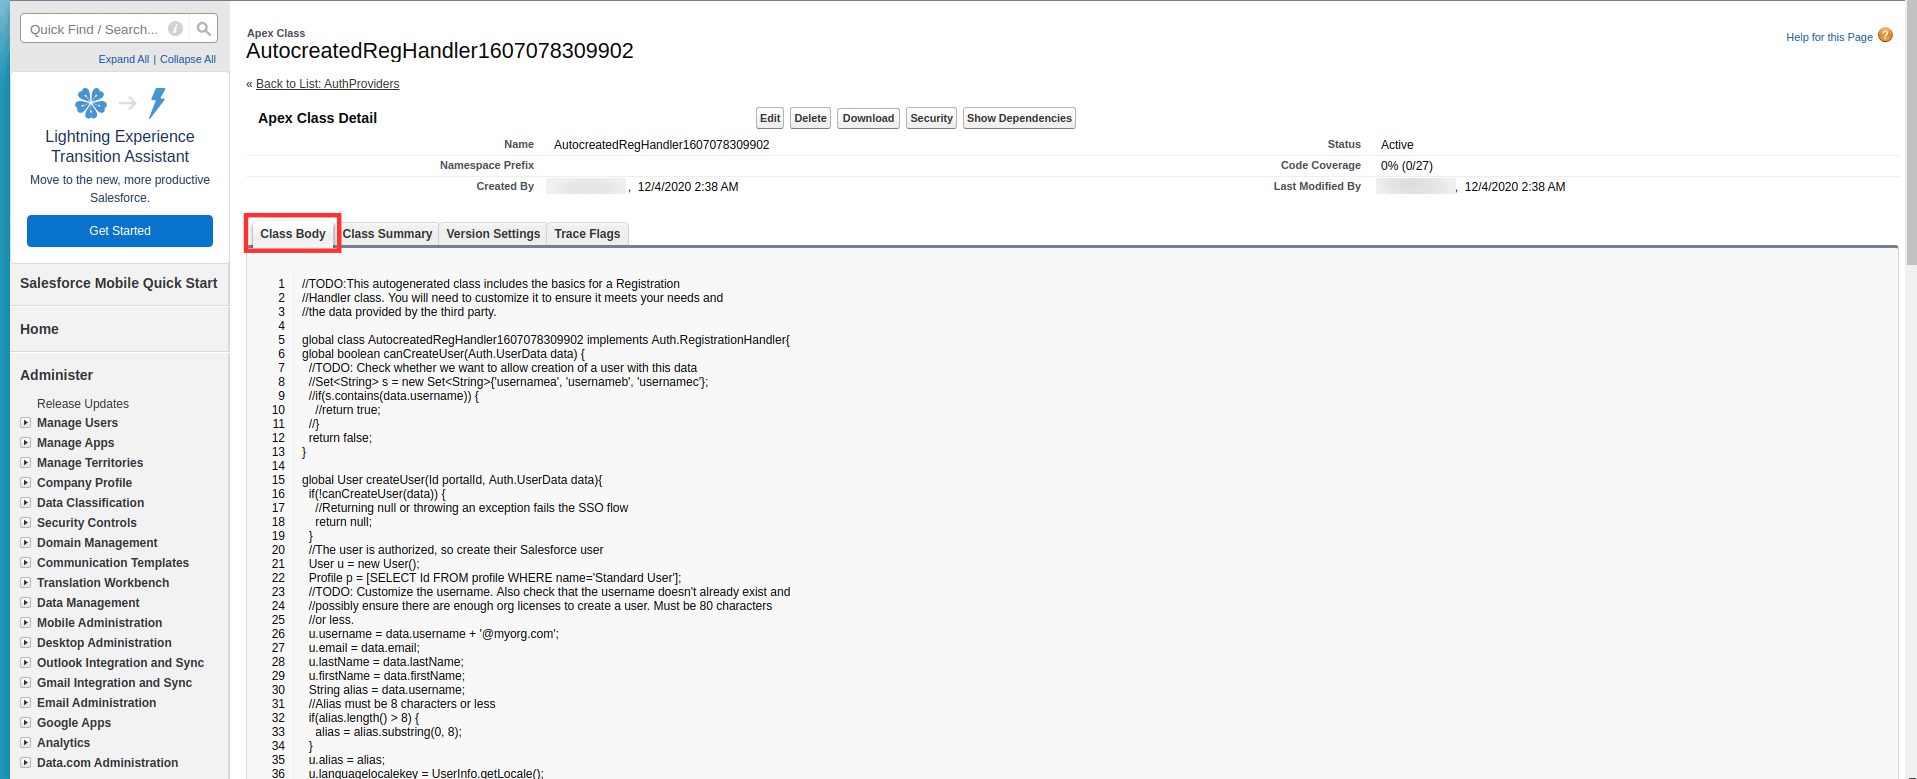
  19. global class IDMPOIDCHandler implements Auth.RegistrationHandler{

    global User createUser(Id portalId, Auth.UserData data){

    //The user is authorized, so create their Salesforce user

    User u = new User();

    String username = data.email;

    List userList = [Select Id, Name, Email, UserName From User Where ( UserName =: username) AND isActive = true ];

    if(userList != null && userList.size() > 0) {

    u = userList.get(0);

    }

    return u;

    }

    global void updateUser(Id userId, Id portalId, Auth.UserData data){

    User u = new User(id=userId);

    update(u);

    }

    }

    Configure Oauth or OpenID Connect SSO for custom application
  20. Now, to include the instance of ADSelfService Plus in the Salesforce login screen, go to Administer → Domain Management → My Domain.
  21. Click the Edit button next to Authentication Configuration.
  22. Configure Oauth or OpenID Connect SSO for custom application
  23. In the next page, check the box next to ADSelfService Plus' instance under Authentication Service. Click Save.
  24. Configure Oauth or OpenID Connect SSO for custom application

ADSelfService Plus (identity provider) configuration steps

  1. Switch back to ADSelfService Plus' Salesforce configuration page.
  2. Configuring SSO information for Salesforce in ADSelfService Plus

  3. Enter the Application Name and Description as per your preferences.
  4. Enter the Domain Name of your Salesforce account. For example, if your Salesforce username is johnwatts@thinktodaytech.com, then thinktodaytech.com is your domain name.
  5. In the Assign Policies field, select the policies for which SSO need to be enabled.
  6. Note: ADSelfService Plus allows you to create OU and group-based policies for your AD domains. To create a policy, go to Configuration > Self-Service > Policy Configuration > Add New Policy.
  7. Under the SSO tab, select Enable OAuth/OpenID Connect.
  8. Choose OAuth/OpenID Connect from the Select Method drop-down.
  9. Enter the Salesforce portal's login URL in the SP Login Initiate URL field.
  10. Note: Salesforce requires sign-in to begin from their login page, known as SP-initiated login. Users are first directed to the Salesforce login page, specified in the SP Login Initiate URL field, after which Salesforce (the SP) redirects them to ADSelfService Plus (the IdP) for authentication.
  11. Enter the Redirect URL copied in Step 11 of configuring Salesforce in the SSO Redirect URL field.
  12. Using the Scopes drop-down, select openid, which is the scope required for OIDC authentication. You can also specify scopes such as profile or email to include extra user information in the authorization request.
  13. Note: Scopes specify the level of access the access token has. They are typically included in the authorization request. Specify the scopes for which you wish to allow access to your authorization token, using the drop-down.
  14. Click Add Application to save the configuration.

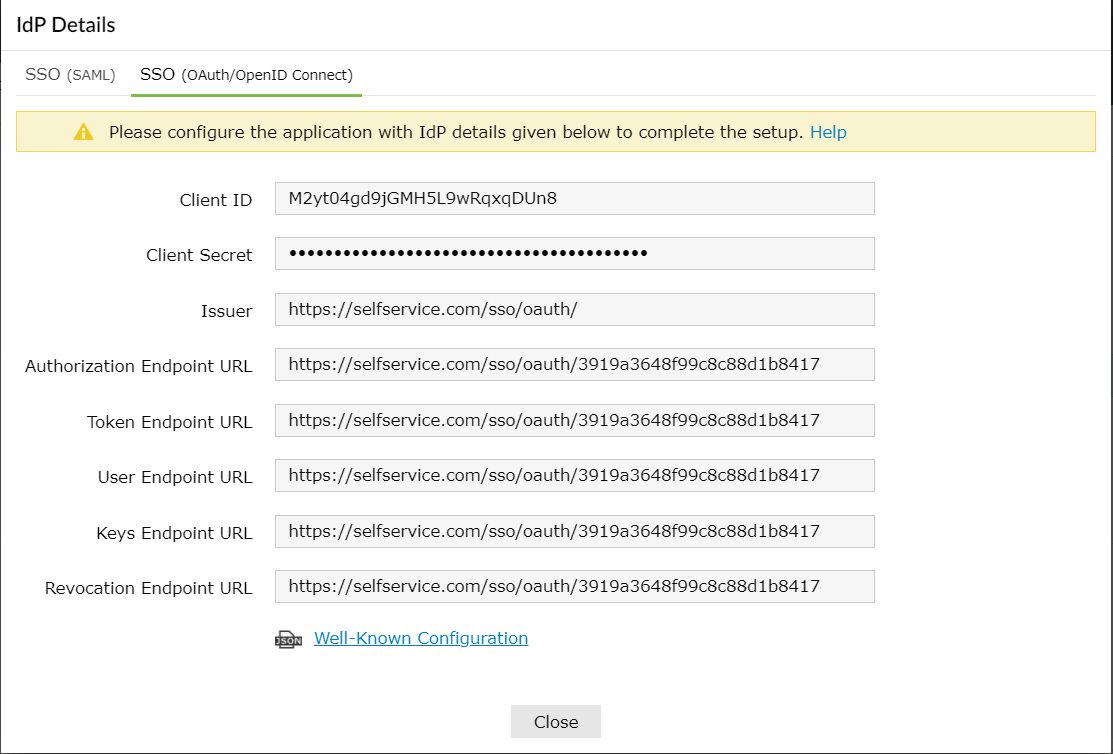
The Well-known Configuration URL in the IdP details pop-up contains all the endpoint values, supported scopes, response modes, client authentication modes, and client details. This is enabled only after you finish configuring the application for SSO in ADSelfService Plus. You can provide this to your service provider if required.

Go to Top

Copyright © 2025, ZOHO Corp. All Rights Reserved.